10 Great Exercises You Can Do At Home
10 Exercises you can do at home
Exercising helps to get your body in shape, provide better health, offer energy and improve your self-esteem. But you don’t always find the time or money to enroll in a gym or even do some martial art.
In these cases, I can tell you that your home may be the best place for you to exercise. In this way, you will gain time and money, besides being able to work several muscle groups without needing complex equipment, using everything you find at hand and with the help of your body weight.
Tips Before Doing Physical Exercise
Before you resort to physical activity in your home, check out some tips to optimize your exercises: A physical evaluation is essential. First of all, warm up so that the blood circulates and avoid injuries. With up to 10 minutes of aerobic exercise is enough. You can jump rope, run in the neighborhood, among others. Be careful not to get injured. Since you don’t have a teacher to help you with the right movements, the tip is to look for online videos that explain each activity and the ideal movement to do. On the other hand, if you suffer from problems in specific areas (knees, back, neck, shoulder), the best thing is to look for a health professional to make the correct indication of the activities you can do. In principle, the most important thing than using more weight for the activity is to make the correct movement. Prioritize the second choice, do the exercise with slow movements and your muscles will enjoy the exercise better.
Best Exercises you can do at home
Warming Up
Primarily, it is fundamental before any physical activity. Without it, your chances of suffering some kind of injury increase considerably, and you don’t exploit the full potential of your muscles. Also, remember to activate your upper and lower limbs.
Warm-up is the most important and indispensable part of every training. Thanks to the warm up the probability of injuries during the exercises decreases considerably and your performance during the training will be better. The warm up lasts about 15 minutes. Warm up muscles are more efficient and exercises performed during the main workout are more pleasurable because the body is properly prepared.
The warm up described below should be done intensively and should be treated as an integral part of the training:
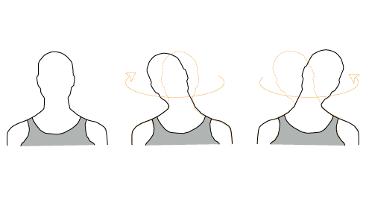
Head rotation
Start position:
- We stand straight on upright legs,
- feet to shoulder width,
- oose hands along the torso.
Exercise: 20 Repetitions
We make the head movements to each side.
Rotate the forearms
Start position:
- Same position as the previous exercise, hands raised at shoulder height.
- Exercise (We perform dynamic rotations of the forearms at the height of the elbow joint):
30 seconds to the inside,
30 seconds out.
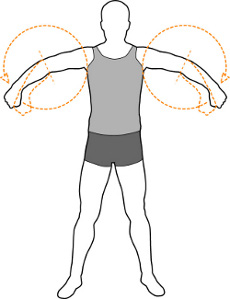
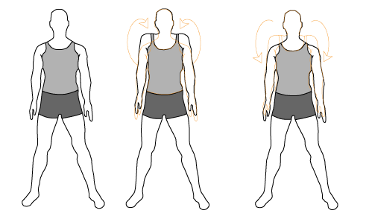
 Arm rotation
 Arm rotation
Start position:
- Legs to shoulder width,
- hands stretched along the torso.
Exercise (We perform the circulation movement with both hands at the same time):
20 times forward,
20 times back,
20 times in opposite directions.
Shoulder rotation
Start position:
- Legs to shoulder width,
- hands stretched along the torso.
Exercise: 20 Repetitions
Perform the movement of the shoulders forward and backward.
Wrist rotation
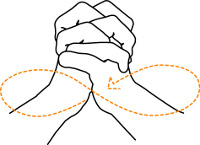
Start position:
- Hands intertwined finger to finger.
Exercise: 60 seconds
We move the circulation to both sides.
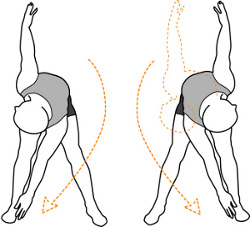
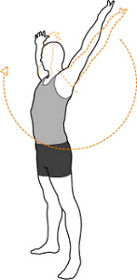
Torso Flexes
Start position:
- We stand straight on upright legs,
- feet across the shoulders,
- trunk bent to the legs at a 90-degree angle,
- hands straight to the sides.
Exercise: 20 SIDE-HAND Repetitions
Make movements as wide as possible to the left and right.
We directed our gaze in the direction of the ascending hand.
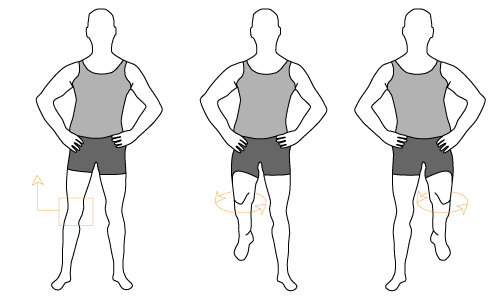
Hip rotation
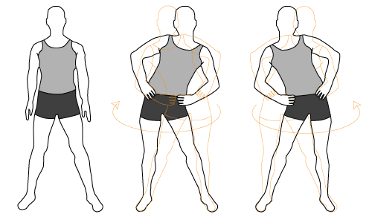
Start position:
- Hands on hips, head stays straight.
Exercise: 10 Repetitions
We do extensive hip rotations.
The exercise should be done 10 times for the left side and 10 times for the right side.
Rotation of the legs at the knee level
Start position:
We keep our legs slightly open, our hands on our hips.
Exercise: 10 Repetitions for each leg
We lift the bent leg on the knee.
We rotate the leg on the knee left and right.
We change legs.
Foot rotation 
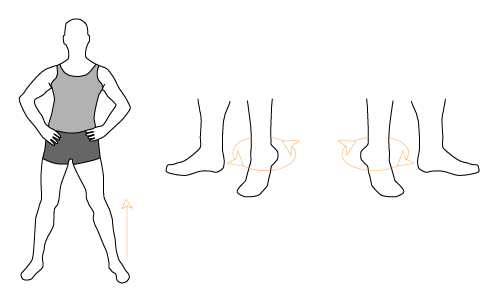
Start position:
- stay with our legs slightly open, we support the weight of the body on one foot, we lift the other, leaning on our fingers.
Exercise: 10 Repetitions for each leg
Rotate with the heel of the foot, which should be resting on the toes, to the left and to the right.
Change legs.
Abs
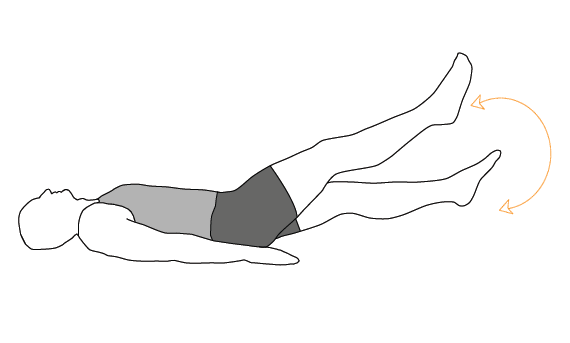
Start position:
- Lie on your back, legs up about six inches above the ground.
Exercise: 2 TIMES 30 SECONDS
Horizontal scissors for 30 seconds.
Five seconds apart.
Vertical scissors for 30 seconds.
Back muscles

Start position:
We remain lying on our bellies.
Exercise: 20 Repetitions
We lift our hands and legs off the ground at the same time and keep them up for 1 second.
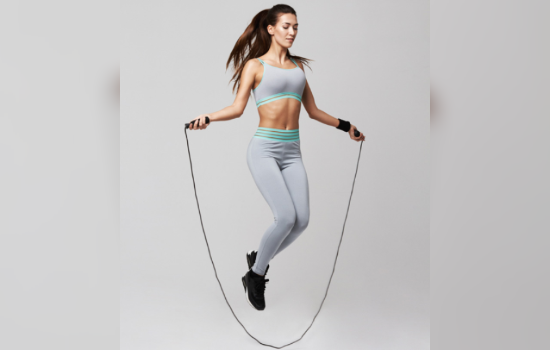
Jump Rope (AEROBIC)
For those who don’t count on a bicycle or treadmill, jumping rope is a great option for aerobic exercise. Because in 15 minutes of activity you lose 180 calories (against 140 from the race). This same period is equivalent to 1 hour of walking. Moreover, the rope strengthens the bones and lower limbs (thigh, calf).
So, start with 10 minutes of activity and don’t worry, the rhythm and coordination comes with time and practice.
Skipping Rope Tips: Opt for comfortable clothes that avoid sweat. Wear sneakers with cushioning that supports the impact of the jumps, to avoid injuries to the joints; This way, always keep your body straight, looking forward; Start jumping with both feet and, when landing, do it with the front of your feet. Jump with your legs extended and land with your knees bent. This way, you only need a good rope and take a few minutes to get good results.
There are ropes of all types and sizes. To adjust the right size, the tip is to hold the rope with your hands, step on the center of the rope with your feet together, stretch until the rope you support your hands on is at chest height, near your armpits. As for the material, the ideal thing for beginners is to look for ropes made of light material, such as nylon ropes. Fabric coated steel, sisal and leather ropes, for example, are also good, but are heavier and take longer to loop. Heavier weight ropes are good options for those already at a more advanced level. It’s a way to intensify your training. The handles – the rope you hold the rope on, should be made of strong material, such as PVC, and preferably rubberized, preventing your hands from getting bruised or calloused. When you go shopping, see if the handles can be replaced when they wear out. There are ropes of various prices.

Push ups (SHOULDERS, CHEST, ARMS)
Push-ups are an extremely important exercise for strengthening the shoulder, chest and arm area. You can start the activity with 3 sets of 10 movements each and a 2 minute interval between sets. To do this exercise correctly, your arms should be aligned with your chest and open in a position that your elbows bend approximately 90 degrees. Your elbows are flexed outward. The position of your hands and the movement of your elbows are important, because if both are closed, the main force passes to the triceps, which makes the exercise even more difficult. Thus, the exercise starts with an elbow flexion until the chest reaches two fingers from the floor and returns to the initial position with the extension of the arm, keeping the torso steady, without letting the hip fall.
Tips: For beginners and who still cannot make the full movement, you can support the knees on the floor; Always contract the abdomen: it is important to avoid injuries to the lumbar; Descents should be done slowly: when you are descending in movement maintain the resistance.
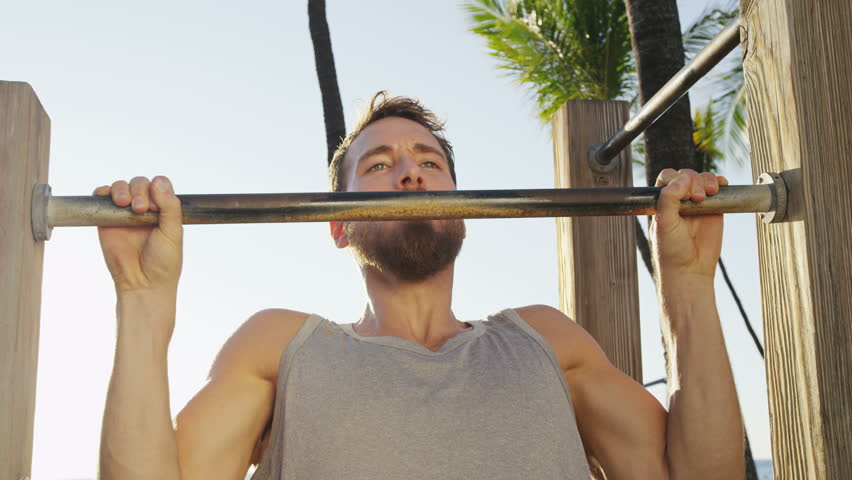
Fixed Bar (BACK, BICEPS AND ABDOMINAL)
For this exercise, you will need to buy a door bar and attach it to the wall. The cost is usually under 100 dollars, but the daily physical activity can provide you with a benefit that will pay off your investment. If you don’t want to spend money, you can resort to activity in parks and squares. In short, the fixed bar allows you to perform several variations and work different muscle groups with a single device. Besides working the back (mainly the wing) and biceps, in the traditional movement, you can strengthen your abdomen by doing isometry (braking the movement on top, concentrating forces on the abdomen). In addition, you can use three different types of footprint on the bar: supine (with the palm of your hands facing you), pronounced (with the back of your hands facing you) or neutral (lateral footprint). As the activity will depend on the level and resistance of each one, it starts with 3 series and the maximum number you can do for each series. In this way, give an interval of 2 minutes between one activity and another.
In addition, you can use three different types of footprints on the bar: supine (with the palm of your hands facing you), pronounced (with the back of your hands facing you) or neutral (side footprint). As the activity will depend on the level and resistance of each one, it starts with 3 series and the maximum number you can do for each series. In this way, give an interval of 2 minutes between one activity and another.
Bar types on the market
Currently, there are two different types of fixed bar for sale. The first is the simplest, multifunctional, to install on the door stop. In all movements of this type of fixed bar, the main muscle worked is the latíssimo dorsal, popular wing of the back, assisted by all the musculatures of the back and the biceps. The other model is the fixed bar that comes in L and also allows parallel training. It is more difficult to install, since it needs to be on a wall with a more resistant structure to support. Besides the muscle groups of the first one, this one also works well with the triceps and great part of the chest, allowing many movements with the lower limbs.

Bench triceps dip (TRICEPS, CHEST AND SHOULDER)
With only one stool (chair or sofa) you can develop this physical activity. It will serve as a support point for you to develop this exercise. In this way, sitting on the bench, you will carry your legs forward, stretched and with the support at your heel. Position your hands on the bench according to the desired width, remembering that the arms will be the main support for you. So keep your spine up and direct your body to the floor. Return to your starting position.
This way, the repetition of the movements can occur in 3 series of 15. For the activity you can have at home a bench of supine, which will help you to do this exercise and others of support sitting or lying down.

Squats (THIGHS AND GLUTES)
Simple and functional exercise to activate the lower limbs. Just bend your knees, throwing your arms forward to maintain balance. During descent, the spine should always be upright and the movement has the limit until your leg makes an angle of 45 degrees. This way, you can intensify the activity by putting weight on the movement. To start, 3 series of 20 repetitions, with an interval of 2 minutes. However, you can intensify the training by holding washers, dumbbells or Kettlebell.

Biceps with Dumbbells (BICEPS AND SHOULDER)
For this activity will need dumbbells. Getting some dumbells for you to workout at home should only set you back a few dollars. Hold a dumbbell in each hand and arms completely extended with the palms facing the sides of the body. Also, the feet should be aligned with the shoulders and the dumbbells supported at thigh level. This way, perform the thread bringing a dumbbell towards the same shoulder, keeping the opposite arm extended.
When bringing the weight, rotate your wrist slightly so that the palm faces you. Pause and then return to your starting position. Alter the sides on the next replay. Even more, this activity can be done while sitting. The movement can also be done in two ways: alternate (one arm at a time) and simultaneous (two arms together). First of all, do 3 series of 12 repetitions, with an interval of 1 and a half minutes.
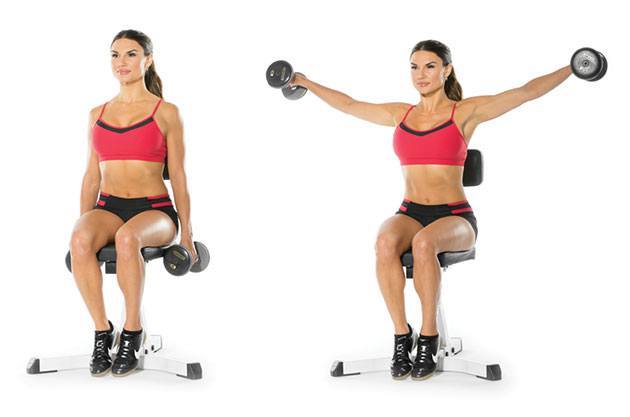
Lateral Elevation (SHOULDER, TRAPEZIUS)
This physical exercise needs to be done with the help of dumbbells. In the upright position, hold the dumbbells with your arms outstretched. Lift the arms outwards and to the sides of the body until the dumbbells reach shoulder level. Lower the dumbbells back to the hips. That way you can do this exercise using only one arm at a time and stabilizing the torso with your free hand. Also, you can do the activity with 3 sets of 10 in a 1 and a half minute interval.

Front Elevation (CHEST AND SHOULDERS)
This activity is similar to the previous one. Standing or sitting with your back straight at the end of an exercise seat, hold a pair of dumbbells fixed to the sides of your body with your arms outstretched. Thumbs should be pointing forward. Lift a dumbbell forward to shoulder level, keeping the elbow rigid. In this way, lower the weight back to the starting position and repeat with the other dumbbell. You can do it alternately (each arm at once) or simultaneously (both at the same time). Thus, you can do the activity with 3 series of 10, in an interval of 1 and a half minutes.